Standard Chain Bridge in 10 easy steps
Editors note: This should help people figure out how to install a chain bridge on their own. This article below describes a typical installation on a 80's-90's RWD GM car. Methods differ for older cars. (i.e. 58-64 impalas) E-mail us for more info. Other hydraulically challenged sites have posted half ass ways of doing this but we feel people should know how to do it the right way before they rush into cutting their car up like a hack. This article has a real chain bridge with chains! That's why we call it a chain bridge. C-H-A-I-N Bridge! get it!
Chain Bridge Requirements:
* At least four batteries for some weight
* Separate pumps for rear of car
* Full frame reinforcement
* Rear axle reinforcement
* Heavy duty welder
* No accumulators in the rear
* Body reinforcement in the rear quarter panels
* Good body mounts
* Mechanical Know - How
Step 1: Remove gas tank and carefully cut old spring perches off the frame. Avoid the gas lines and brake lines! Grind the frame smooth in those spots where the perches were.
Step 2: Make a template out of cardboard of the inside of the frame where the perches were. Trace the templates onto 3/8 inch thick steel. Cut out the reinforcement and grind down the edges. Clamp the reinforcement in place with C - clamps temporarily.
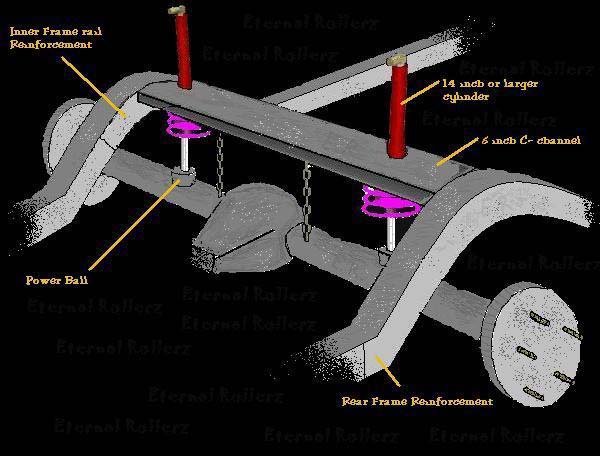
Step 3: Measure between the frame rails and cut out a piece of 6 inch C - channel to fit. Make clean holes for the cylinders to pass through and weld on upper chain mounts.
Step 4: Place the C - channel in position. Make sure nothing is in the way of the chain bridge. Tack weld the C - channel to the inner frame reinforcement
Step 5: Remove the clamps from the frame reinforcement and remove the chain bridge from the car. Weld all around the C - channel.
Step 6: Now make sure the frame is clean metal and put the bridge back into place and weld it all in. Note: Doing it this way will save you from cutting out your trunk and it is stronger for 3 - wheel because a larger surface is welded in.
Step 7: Weld chain mounts onto the rear axle, as close to the pumpkin a possible. Grind down the lower spring perches on the axle and weld in power balls.
Step 8: Put in 14 inch or larger cylinders and hardware using the coil over method. 2 ton springs or higher must be used with the chain bridge.
Step 9: You need to figure out how long the chain needs to be. Use a jack to raise up the front corner until the opposite rear corner hit the ground. (or close to it.) Cut the chain to length in this position. If you have slack then cut the chain down to the next link. Install the chains with the car down. Note: Use only 3/8 inch transport chain and Grade 8 bolts.
Step 10: Now lift up the front of the car all the way up and lift up only one of the back cylinders. Oh yeah! Nice 3 - wheel! Note: NEVER lift the other side in the rear when the other is all the way up! Serious damage may result!
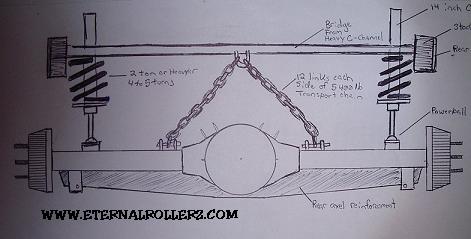
Above: Another way to run the chains on the bridge. This dosn't work as well as the other way.
All Photographs and Art Copyright
© 1998-2005 Eternal Rollerz C.C.
Website Design Copyright © 1998-2005 Webmaster